From Friday Deep-Dive · Friday, June 5, 2026 · 14 min read
Getting the image you actually pictured
Everyone who's tried generating an image with ChatGPT has had this experience: you ask for something, you picture exactly what you want, the AI gives you something different — and you accept it, because you don't know how to tell it what was actually in your head. Most of the AI images you see online are the result of that compromise. They're not the image the creator wanted; they're the image ChatGPT defaulted to. There's a real skill gap between "AI is fine, I guess" and "AI gave me exactly what I pictured," and it's smaller than most people think. The fix is a set of four techniques — vocabulary, reference, iteration, negation — that take a vague prompt and aim it at the specific image you have in your head. Once you've practiced them on a single image, the rest become muscle memory. In the full post: why ChatGPT defaults to generic outputs, the four levers that aim it at the specific image you want, the reverse-prompting trick that captures any style in 90 seconds, how to build a personal reference library you can reuse forever, and five "I want THAT image" scenarios with the prompts to get there.
Everyone who's used ChatGPT for image generation has had this experience. You ask for something. You picture exactly what you want in your head — the lighting, the mood, the texture, the era. The AI gives you something different. And you accept it, because you don't quite know how to tell it what you were picturing.
Most of the AI ads and stock-replacement images you see online are the result of that compromise. They're not the image the creator wanted. They're the image ChatGPT defaulted to.
The skill that separates "AI is fine, I guess" from "AI gave me exactly what I pictured" is something you can learn in twenty minutes. It's a set of techniques for aiming a vague prompt at the specific image you have in your head. Here they are.
Why ChatGPT defaults to generic
When you give ChatGPT a vague prompt — "a family at a restaurant" — it has to guess what you meant. It guesses the average of every "family at a restaurant" image it's ever seen during training. That average is, by definition, the most generic possible answer. Bright lighting. Smiling parents. Two kids. Wood tables. A vague rustic-modern aesthetic. The image looks fine and also looks like every other AI image — because it IS every other AI image, averaged.
The fix is to stop letting ChatGPT guess. Give it enough specifics that the only image satisfying the prompt is the one in your head.
The four levers
There are exactly four levers for steering ChatGPT toward your specific vision. Pull all four and the generic-default problem disappears.
Lever 1: Vocabulary — name the style precisely
Vague: "cinematic photo of a woman in a kitchen."
Precise: "shot on Kodak Portra 400, 50mm lens, slightly underexposed, late afternoon natural light through a north-facing window, the look of an editorial portrait from a 1990s Sunday magazine."
The vocabulary that locks down a specific look usually has three axes:
- Medium and era. Film stock (Portra 400, Tri-X), camera era (1970s SLR, 2010s mirrorless), publication context (1990s editorial, 2000s catalog).
- Lighting. Natural or artificial, hard or soft, direction (overhead, side, backlit), time of day (golden hour, blue hour, overcast).
- Mood and texture. Warm or cool, grainy or clean, contrasty or flat, lived-in or pristine.
Three sentences of vocabulary at this level beats fifteen sentences of "make it look really good."
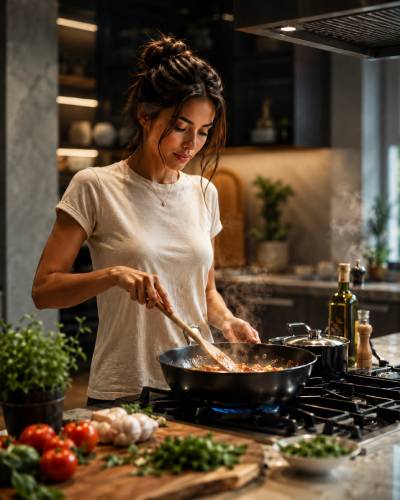
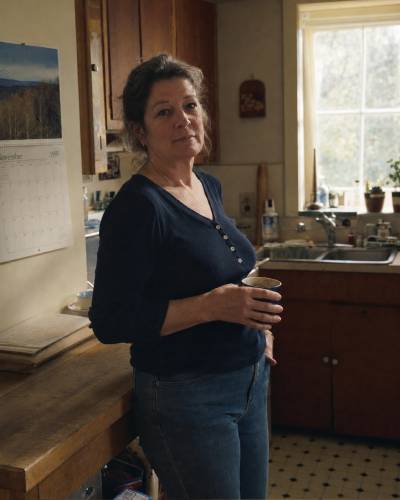
A quick honest note about that comparison: the vague-prompt image isn't bad. ChatGPT's image generation has gotten good enough that even lazy prompts produce competent photos. The gap between the two images isn't quality. It's specificity.
The first image could be any model in any kitchen in any year. Perfectly fine, instantly forgettable. The second image is this 55-year-old woman in her kitchen in November 1995 — calendar on the wall, linoleum on the floor, a face that looks like she's lived through things. The detail of the calendar alone is something no AI defaults to. It tells you a human wrote that prompt on purpose.
That's the actual deliverable when you pull the vocabulary lever: not better photography, more deliberate craft. The reader's eye registers the specificity, and the image stops feeling like AI and starts feeling like yours.
Lever 2: Reference images — upload a photo with the look you want
ChatGPT can read images. If you upload a reference and say "match this style, swap the subject for X," it'll get closer in one shot than ten paragraphs of description can. Your reference can be anything — a magazine clipping, a Pinterest pin, your own paper's archive, a movie still, even a screenshot from a competitor's ad you admired.
The reference image lets you skip having to name a style you can recognize but can't articulate. ChatGPT does the articulation for you.
Lever 3: Iteration — treat the first generation as a draft
The first image is almost never the one. The second is closer. By the fourth, you're usually there. There are two ways to iterate, and most publishers only know about the first.
Way 1: Re-prompt the chat. Best for global changes — overall mood, era, composition, swapping out the whole subject or setting.
- Don't just say "make it better." Name what's wrong: "the woman should be older — late 50s instead of 30s. The kitchen should have linoleum floors instead of hardwood."
- Don't restart from scratch. Build on the last image: "keep everything the same, but change the lighting to morning instead of afternoon."
- Don't iterate forever. If you're four rounds in and farther from your vision than you started, scrap the chat and start over with a fresh four-lever prompt.
Way 2: Select and paint over the specific area you want changed. This is the move most publishers don't know about, and it's the one that turns iteration from "regenerate the whole image and hope" into surgical editing.
Click on a generated image inside ChatGPT. A Select button appears in the upper right. Click it, and you can paint over any region of the image — the misplaced hand, the wrong sign in the background, the face that came out wrong, the bottle of ketchup that's somehow upside-down — then describe in the chat what should be there instead. ChatGPT regenerates only that area, keeping everything else intact.
This is the difference between "the image is 90% right, I'll just live with the wrong hand" and "I'll fix only the hand." Once you start using Select, you stop accepting partial wins. You ship the image you actually pictured.
The skill is knowing when to use which: re-prompt the chat for mood, lighting, and composition; use Select for specific objects, faces, hands, signs, text, and details.
Lever 4: Negation — tell it what NOT to do
ChatGPT defaults toward all the AI tells: plasticky skin, too-perfect lighting, the generic AI-model face. You can prompt them out:
- "No glossy reflections, no airbrushed skin, no symmetrical perfect lighting."
- "Avoid the default AI photo look — no soft focus on everything, no perfectly centered subject, no idealized faces."
- "This should look unretouched, like a real candid photo, not a magazine cover shoot."
Negation works because it tells the model which average to avoid.
The shortcut: reverse prompting
If you have a reference image but don't want to write the prompt yourself, ChatGPT will write it for you. Upload the reference and ask:
"Describe this image as a detailed image-generation prompt — include subject, setting, lighting, photography style, film stock if you can tell, and any imperfections that make it feel real. Format it so I can paste it back into ChatGPT to generate similar images."
Out comes a four-lever prompt, captured from your reference, ready to reuse. This is called reverse prompting, and it's the fastest way to teach yourself the vocabulary in lever one — you read what ChatGPT writes and you absorb the language.
Build your personal reference library
This is the compounding move that ties earlier techniques together: build a folder of reference images you love, reverse-prompt all of them (the trick from earlier — hand ChatGPT an image, let it write the prompt for you), and save those prompts inside a ChatGPT Project. Now whenever you need a specific look, you don't start from a blank page — you start from your own curated style library that fits your eye, not the AI's default.
Here's how to actually build one, step by step. It's a weekend of work, max.
Step 1: Create a ChatGPT Project for the library.
In ChatGPT's left sidebar, click + New Project. Name it "Visual Reference Library" or "Image Style Library" — whatever you'll recognize at a glance.
A Project is the right home for this because everything lives in one place:
- The reference images get uploaded to the Project's Source tab — that's the area inside the Project where ChatGPT keeps all uploaded files.
- The prompts ChatGPT writes for each image (you'll do this in Step 3) get saved in a single Word document, dropped into the same Source tab.
- The chats where you actually generate new images get started from inside the Project — which means your references are always one click away.
Step 2: Gather ten reference images.
Spend twenty minutes collecting:
- Five feature photos from your own paper's archive that you wish you could replicate. Open old issues, screenshot the photos you remember loving.
- Three editorial photos from magazines whose visual style you admire. Travel + Leisure covers, Bon Appétit food shots, Vanity Fair portraits — whatever your taste runs to.
- Two product or ad photos from local businesses whose look you'd want to capture. Their Instagram, their website, their last ad in your paper.
Save all ten as image files (PNG or JPG). Don't worry about resolution — these are style references, not source material.
Step 3: Reverse-prompt each one inside the Project.
Open a new chat inside your Project (not in a generic ChatGPT window — start from inside the Project so everything stays in one place). For each of the ten images:
- Upload the image to the chat.
- Paste this: "Describe this image as a detailed image-generation prompt — include subject, setting, lighting, photography style, film stock if you can tell, and any imperfections that make it feel real. Format it so I can paste it back into ChatGPT to generate similar images."
- Copy the prompt ChatGPT writes back.
About two minutes per image. Ten images = twenty minutes.
Step 4: Save everything to the Project's Source tab.
In your Project, find the Source tab — that's where ChatGPT keeps every file you upload. Two things go in:
The ten reference images. Drag the JPG or PNG files into the Source tab. They're now available to every chat in the Project.
A Word document called "Style Library" that holds all ten prompts. A regular .docx file works perfectly here — most publishers already have Word, and ChatGPT reads it cleanly. (If you happen to know what a Markdown file is and prefer that, .md also works — but for almost everyone, Word is the right pick.)
Inside the Word doc, give each style a clear heading using Word's Heading 2 style (the dropdown in the toolbar). Under each heading, paste the prompt ChatGPT wrote. Repeat for all ten styles. The structure looks like this:
Style Library                       ← Heading 1

1985 Sports Section                 ← Heading 2
[paste prompt #1]

Bon Appétit Food Shot               ← Heading 2
[paste prompt #2]

Downtown Diner Instagram            ← Heading 2
[paste prompt #3]

[continue for all ten]
Using Word's Heading styles gives you a clickable outline in the document — when you're working fast, you can jump straight to the style you need. Save the document, then drag it into the Project's Source tab alongside the images.
Step 5: Test one prompt to make sure it actually works.
This is the step most "how to" advice skips, and it's the one that decides whether your library is useful or just decorative.
Open a new chat inside the Project. Paste one of your saved prompts — without uploading the original reference image. Generate.
The output should land in the same neighborhood as the original reference. If it's off, tweak the prompt in your Style Library document (add more specifics), save it, and re-upload the updated file to the Source tab. Then re-test.
Step 6: Do you have to reference the library every time? (Yes, but it's 15 seconds.)
This is the honest part most guides skip: the library is a lookup, not auto-applied. You don't paste your whole library into every chat. You open your Style Library doc, find the prompt that matches what you want today, copy it, paste it, and adapt.
The day-to-day workflow:
- Open a new chat inside the Project. Always start from inside the Project — that's how you keep the library one click away.
- Open your Style Library document from the Source tab. Scan the headings, find the closest match.
- Copy that prompt. Paste it into your new chat.
- Swap the subject and setting details for your current need. The vocabulary, lighting, film stock, and imperfection notes stay locked in.
- Generate. Iterate as needed.
Fifteen seconds of copy-paste-adapt, and your generated image lands in your known style instead of the AI's generic default.
One option for the lazy version: you can add a line to your Project's Instructions that says "When I ask you to generate an image, look at the reference images in this Project's Source tab and match the style of the closest one to my request unless I tell you otherwise." This lets you just say "generate an image of a high school football game at dusk" and ChatGPT picks a style on its own. It works some of the time. For consistent results — especially when you've sold a client on a specific look — stick with the manual copy-paste from your Style Library doc.
A weekend of upfront work. Ten templates that fit your eye. A library you can pull from for years.
Lock your default style in a Project
For the styles you reach for over and over, don't even bother pasting the prompt each time. Put them in a ChatGPT Project.
A Project is a folder of related chats with shared instructions. Set up a "Visual Library" Project with your default style baked into the instructions, and every chat inside that project applies your style automatically. Your prompts shrink from four paragraphs to one sentence:
"Generate an image of a high school football game at dusk."
The Portra 400 grain, the soft natural lighting, the realistic skin texture, the slightly imperfect framing — all of it applies itself from the Project's standing instructions. (You can also upload your reference-library images as Project files so ChatGPT pulls visual cues from them on every generation.)
Five "I want THAT image" scenarios
Five scenarios where you have something specific in your head and need to get it out. Each prompt uses all four levers — vocabulary, specific reference language, iteration cue, and negation.
1. "I want a feature photo that looks like our paper from 1985."
"A high school basketball player at the free throw line during a home game, gym packed with people in winter coats. Shot on Tri-X 400, harsh overhead gym lighting, slight motion blur, the look of a 1985 Friday-night sports-section feature photo. Real textures, no retouching, no glossy modern feel. Black and white if needed."
2. "I want the cover of a 1990s travel magazine."
"A wide landscape shot of a state highway running through farmland at dusk, single grain elevator in the distance, sky still pink. Shot on Portra 400, slightly underexposed, the look of a Travel + Leisure cover from the late 1990s. Slight film grain, real textures, no oversaturated colors."
3. "I want a real-feeling Christmas photo, not a Hallmark one."
"A small living room on Christmas morning, real lived-in mess — wrapping paper on the floor, half-drunk coffee mugs on a coffee table, a kid in pajamas with messy hair playing with a new toy. Warm tungsten lamp light. Shot on Portra 400. Avoid the polished Hallmark holiday look — no perfect tree, no matching pajamas, no symmetrical composition."
4. "I want an editorial portrait, not a corporate headshot."
"A 60-year-old farmer standing in front of his barn, late afternoon side light, slight squint, wearing a Carhartt jacket. Shot on a 50mm lens, three-quarter portrait, the look of a 1990s small-town newspaper feature on a local business. Real skin texture, no retouching, no studio lighting feel."
5. "I want a product shot that doesn't look like a stock photo."
"An overhead flat-lay of a wooden-handled hammer on a worn workbench surface with wood shavings, a steel ruler, and a coffee mug nearby. Natural window light from the left. Shot on a 35mm camera, slight grain, the look of a 1980s catalog spread. Real surface textures, no studio softbox glow."
Notice each one is built from the same four levers, dialed to a different specific image.
How to try this week
- Open ChatGPT (Plus or higher for the higher daily image limits; Free works to try the technique).
- Pick one specific image you want. Not "an image" — a specific scene you can describe out loud. Write down the four levers (vocabulary, reference idea, what to keep, what to avoid).
- Generate. Iterate three times — use the chat for global changes (mood, lighting, setting) and the Select button for specific fixes (wrong hand, misplaced sign, the face that needs to be older).
- When you have your specific image: reverse-prompt it. ChatGPT writes the prompt you accidentally created.
- Save that prompt. You just added one entry to your personal reference library.
Do this five weekends in a row and you have a personal style library of five looks you can replicate on demand. That's the unfair advantage publishers who learn this will have over the ones still typing "a beautiful family at sunset."
Have a good weekend.
Try this and tell me what happened.
Did it work? Hit reply. Did it come back sounding like a stranger? Hit reply harder. That’s the interesting failure, and it’s almost always fixable.
Get the next one in your inbox
Tuesday brief + Friday deep-dive. Free. Unsubscribe anytime.
Subscribe — free, twice weekly← Back to How to get the exact image in your head out of ChatGPT